A few channel users have gotten into using sounds with IRC recently, which prompted this tutorial on how to set up sound with your system. Examples here are taken from mIRC v.5.8, which is possibly the most popular IRC client for Windows.
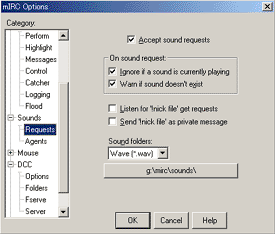 To be able to send and receive sounds to/from other users and the channel, the first thing to do is ensure that your client is listening for sound requests from others. To do this, hit Alt-O. This will bring up the mIRC Options dialog. Scroll down to Sounds and click on Requests. You should see something like the image on the left. At the top, make sure "Accept sound requests" is checked. Then look at "Sound folders." For each type of sound file listed in the drop-down box, choose the directory where these sound files will be stored. Then hit OK. When your client receives a request to play a sound, it will look in these directories for the appropriate sound file.
Now you will be able to hear sounds that people to play to you and to the channel, as long as you have those sound files in the directory you specified. If you do not have the sound, you can either ask the person to send you the sound file via DCC ("Direct Client-to-Client" protocol), or you can download sound packs below. At the moment, we have the sound packs below available. Just click on the link to download the zipped file sets, then unzip them into the sound directory you selected above. Some of these zips also include script for adding items to popup menus so the sounds can be chosen from a menu and played that way. (See below)
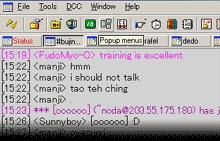 Well, now that you can hear sounds from others, how do you play sounds yourself? The basic mIRC command to play sounds is: /sound [channel | nick] filename.wav (or filename.mp3, whatever). If you specify a channel or nickname, the sound will be sent to that channel or person. If you do not specify a channel or nick, the sound will be sent to whichever is the active window. Since the number of sounds can quickly grow to the point where it is hard to remember sound file names, it is handy to make a popup menu where you can right click and then select which sound you would like to play, and to whom. To do this, click on the "Popup menus" button, which is located to the right of the green button with the "/a." The Popup menus button has three small boxes on it.
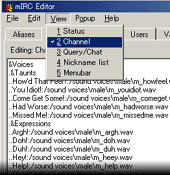 After clicking the Popup menus button, the mIRC Editor window will appear. Here you can edit all of the mIRC menus. In our case, we will add a menu item called "Voices" to the top of the menu that appears when the main channel text area is right-clicked. The example here creates a menu with items for sounds in the first downloadable sound pack above. To add the items to the menu, click on "View" and select "2 Channel." This will set you to add items to the channel menu. To add the actual menu items, copy this code and paste it into the top of the text edit area. We won't go into the format of the menu code itself, you can probably see by examining it that & indicates menu items, . and .. indicate menu levels, - indicates a line in the menu, etc. Click File, Save & Exit to save the menu and close the window.
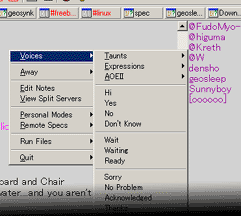 After performing the above steps, you should be able to bring up a menu by right-clicking in the channel window (in the main channel conversation area, not in the nickname list). You should then be able to select a sound and have it played to the channel when clicked. The example to the right shows what this should look like, with the Voices menu at the top, and a sub-menu coming off to the side with further sub-menu options, etc. You can edit and categorize these as you see fit. If you look closely at the example, you can see that an extra menu item called "AOEII" has been added under "Expressions." This was done to add in menus for the second downloadable sound pack above. Code for this is not included here, but you should be able to make your own without too much trouble by following the example code above. Going back into the Popup menus, you can click on View, select Query/Chat, and paste the same code in there to make an identical menu to use when privately talking with someone outside of the main #bujinkan channel.
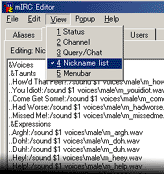 You can also create another menu to use when a nickname is right-clicked in the nickname list beside the main chat area. This can be used to send a sound to only the person whose nickname was right-clicked. To do this, you would follow the example above, except that you would choose "4 Nickname list" from the View menu and put the code in this area. Another difference with this menu is the necessity of the variable $1, which denotes the nickname which was selected. You can see from the example to the left that the $1 is placed between the /sound command and the filename.wav in each line of the menu code. After setting this code, you would again Save & Exit, and should then be able to use the new menu.
Well, hopefully this has given you a bit of a start on how sound works in IRC and how you can participate in playing and listening along with the rest of us. If you have any questions or feedback, just ask in the channel.
|| MAIN ||
 To be able to send and receive sounds to/from other users and the channel, the first thing to do is ensure that your client is listening for sound requests from others. To do this, hit Alt-O. This will bring up the mIRC Options dialog. Scroll down to Sounds and click on Requests. You should see something like the image on the left. At the top, make sure "Accept sound requests" is checked. Then look at "Sound folders." For each type of sound file listed in the drop-down box, choose the directory where these sound files will be stored. Then hit OK. When your client receives a request to play a sound, it will look in these directories for the appropriate sound file.
 Well, now that you can hear sounds from others, how do you play sounds yourself? The basic mIRC command to play sounds is: /sound [channel | nick] filename.wav (or filename.mp3, whatever). If you specify a channel or nickname, the sound will be sent to that channel or person. If you do not specify a channel or nick, the sound will be sent to whichever is the active window. Since the number of sounds can quickly grow to the point where it is hard to remember sound file names, it is handy to make a popup menu where you can right click and then select which sound you would like to play, and to whom. To do this, click on the "Popup menus" button, which is located to the right of the green button with the "/a." The Popup menus button has three small boxes on it.
 After clicking the Popup menus button, the mIRC Editor window will appear. Here you can edit all of the mIRC menus. In our case, we will add a menu item called "Voices" to the top of the menu that appears when the main channel text area is right-clicked. The example here creates a menu with items for sounds in the first downloadable sound pack above. To add the items to the menu, click on "View" and select "2 Channel." This will set you to add items to the channel menu. To add the actual menu items, copy
  After performing the above steps, you should be able to bring up a menu by right-clicking in the channel window (in the main channel conversation area, not in the nickname list). You should then be able to select a sound and have it played to the channel when clicked. The example to the right shows what this should look like, with the Voices menu at the top, and a sub-menu coming off to the side with further sub-menu options, etc. You can edit and categorize these as you see fit. If you look closely at the example, you can see that an extra menu item called "AOEII" has been added under "Expressions." This was done to add in menus for the second downloadable sound pack above. Code for this is not included here, but you should be able to make your own without too much trouble by following the example code above. Going back into the Popup menus, you can click on View, select Query/Chat, and paste the same code in there to make an identical menu to use when privately talking with someone outside of the main #bujinkan channel.
 You can also create another menu to use when a nickname is right-clicked in the nickname list beside the main chat area. This can be used to send a sound to only the person whose nickname was right-clicked. To do this, you would follow the example above, except that you would choose "4 Nickname list" from the View menu and put the code in this area. Another difference with this menu is the necessity of the variable $1, which denotes the nickname which was selected. You can see from the example to the left that the $1 is placed between the /sound command and the filename.wav in each line of the menu code. After setting this code, you would again Save & Exit, and should then be able to use the new menu.